> For the complete documentation index, see [llms.txt](https://help.glpi-project.org/llms.txt). Markdown versions of documentation pages are available by appending `.md` to page URLs; this page is available as [Markdown](https://help.glpi-project.org/glpi-12/manage-my-preferences/manage-my-preferences.md).

# Manage my preferences

User preferences are accessible from the `Preferences` tab of the user form by clicking on your name at the top right of the interface, from any page.

Each authenticated user has the ability to modify their preferences if they have the `Customize` update right in their profile.

{% hint style="info" %}
These options override the default options defined in the general configuration. For more information on the available options, see the [general configuration documentation](/glpi-12/setup/general/general_configuration.md).
{% endhint %}

***

## Main Tab

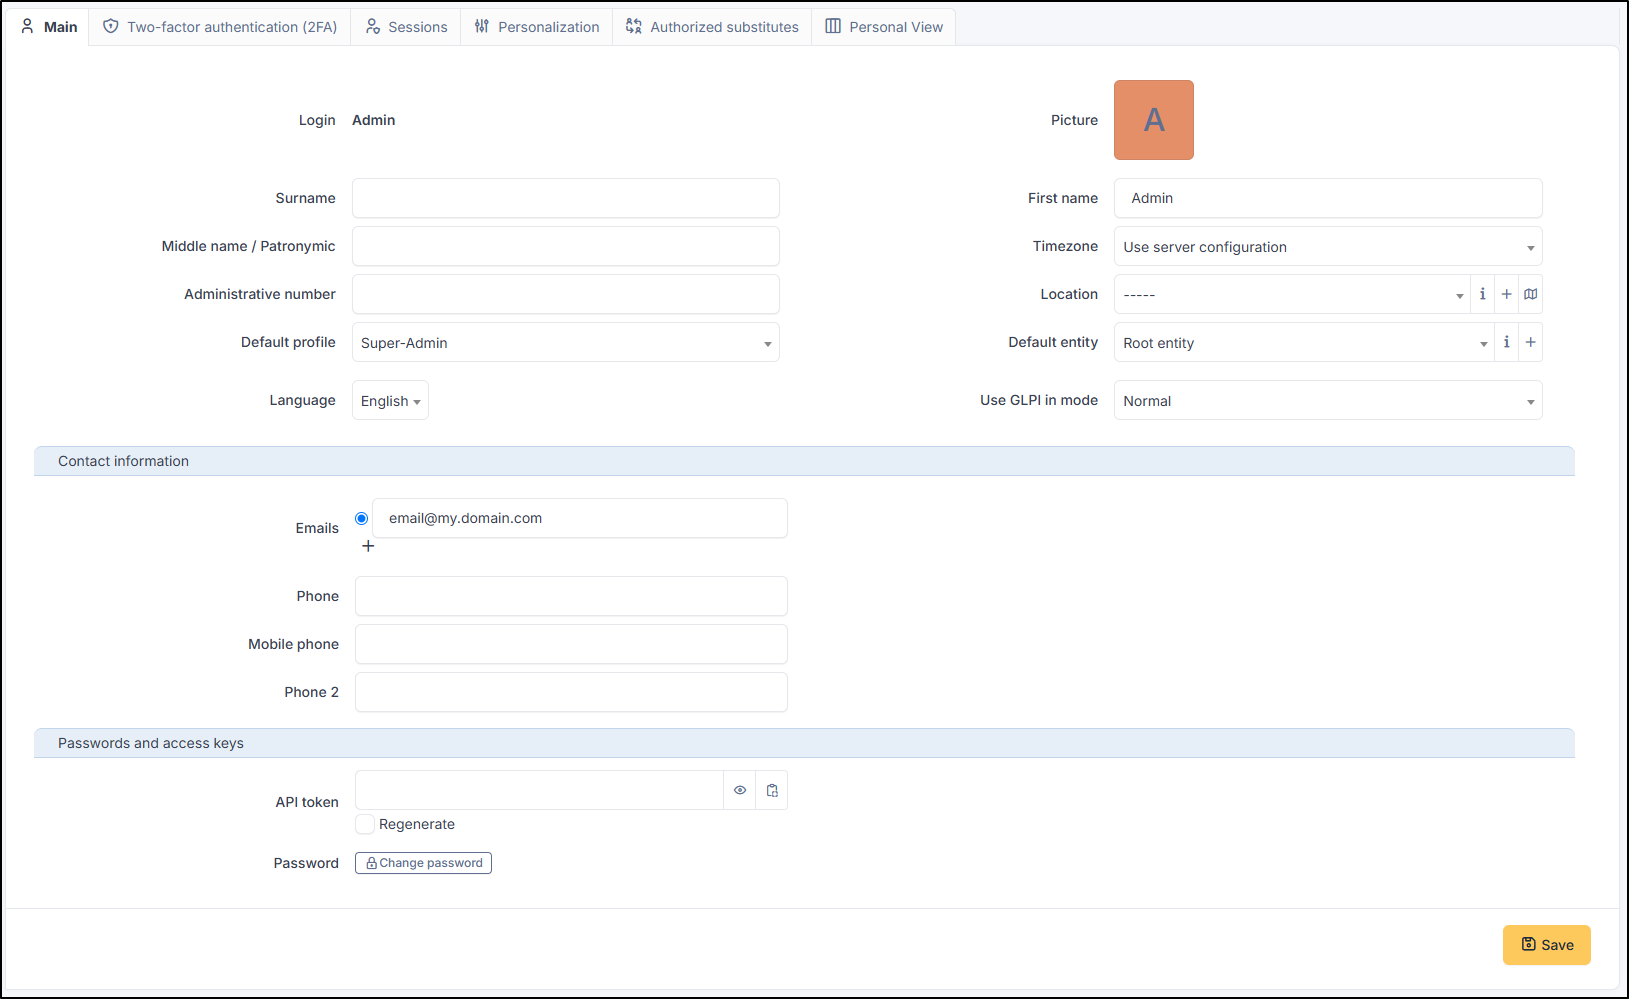
<figure><img src="https://304570660-files.gitbook.io/~/files/v0/b/gitbook-x-prod.appspot.com/o/spaces%2Fuys4bnfAs7Oe2yWUUh3p%2Fuploads%2Fgit-blob-1c8d5d6e205308152574f7426c587ec25541d16b%2Fsettings.png?alt=media" alt=""><figcaption><p>User form screen</p></figcaption></figure>

Here, the user can modify the usual personal information:

* Last name
* First name
* Email address
* Phone numbers
* Location
* Language
* ...

{% hint style="info" %}
Some fields cannot be modified if they come from an LDAP directory.
{% endhint %}

A user can add email addresses and select the default address, which will be used for sending notifications.

They can also specify certain default application behaviors, such as the selected profile and entity. They can also disable notifications for actions they perform.

Depending on the profiles, the experienced user can also choose to exit the normal application mode. In debug mode, GLPI displays errors, all variable values, SQL queries, etc. It is useful to activate this mode in case of GLPI malfunction. A maximum of information can therefore be communicated to developers. This mode also allows for additional information on different objects in a specific tab (notifications, etc.). From the debug toolbar displayed at the bottom of the page, you can also export a JSON file with the execution time, SQL queries and timing breakdown of the page and its AJAX requests, which is useful to share with support when reporting a slowness issue.

{% hint style="info" %}
Note that the Remote Access Key section allows you to regenerate the security key used to access the private feeds offered by GLPI. Currently, the planning ICAL and WEBCAL feeds are protected by this security key which is embedded in the URL.
{% endhint %}

***

## Two-Factor Authentication (2FA)

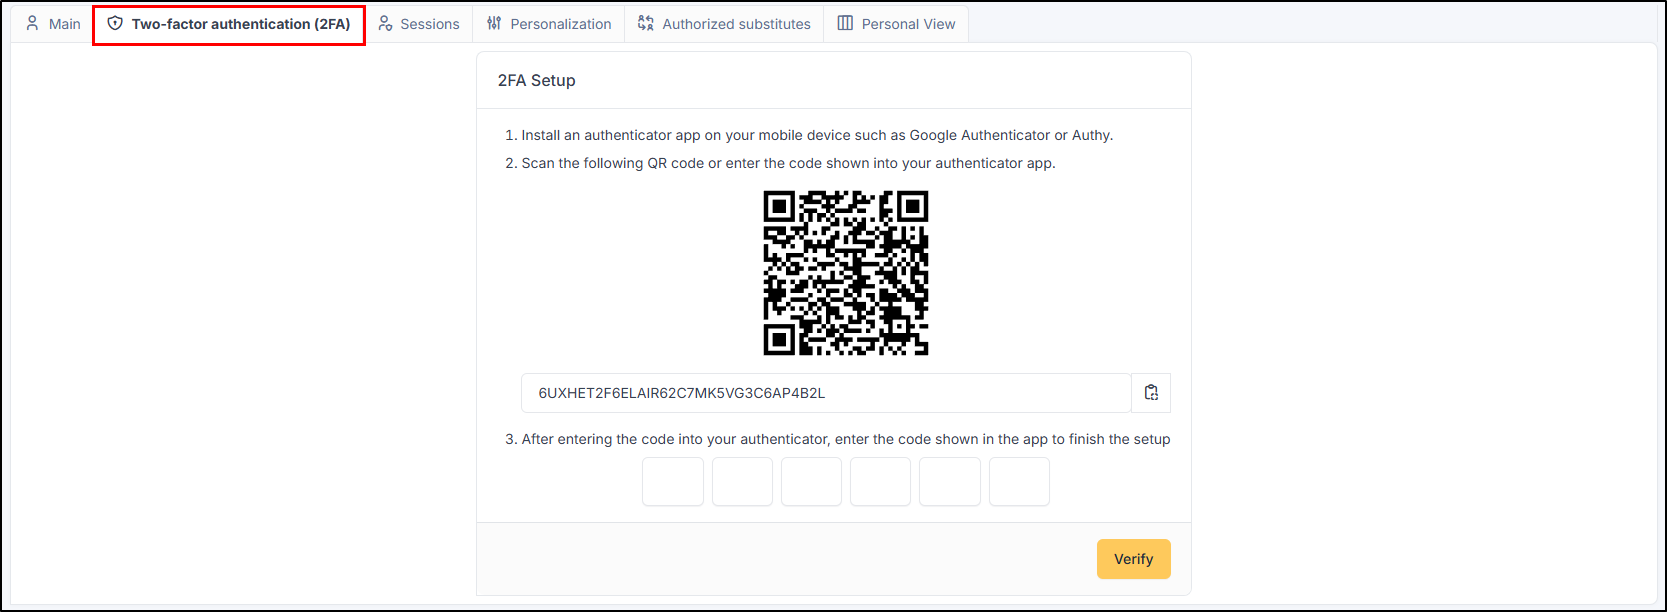
`MFA (Multi Factor Authentication)` is now native in GLPI. It allows you to secure access to your account using double authentication. After entering your password, you will need to enter the access code provided by your application (Free OTP, Authy, Authenticator, etc.).

* First, you need to download an application like *Authy*
* Go to your preferences in the top right corner
* Click on my settings > Two-Factor Authentication (2FA)
* Open your authentication application
* Click on "+" (or new, add, etc. depending on the application you have chosen) and scan the QR code (if you cannot scan the QR code, you can enter the code directly)

<figure><img src="https://304570660-files.gitbook.io/~/files/v0/b/gitbook-x-prod.appspot.com/o/spaces%2Fuys4bnfAs7Oe2yWUUh3p%2Fuploads%2Fgit-blob-54ae066fd0c6723dc80f50666605440427bc0060%2Fsettings-2fa.png?alt=media" alt=""><figcaption><p>MFA Screen</p></figcaption></figure>

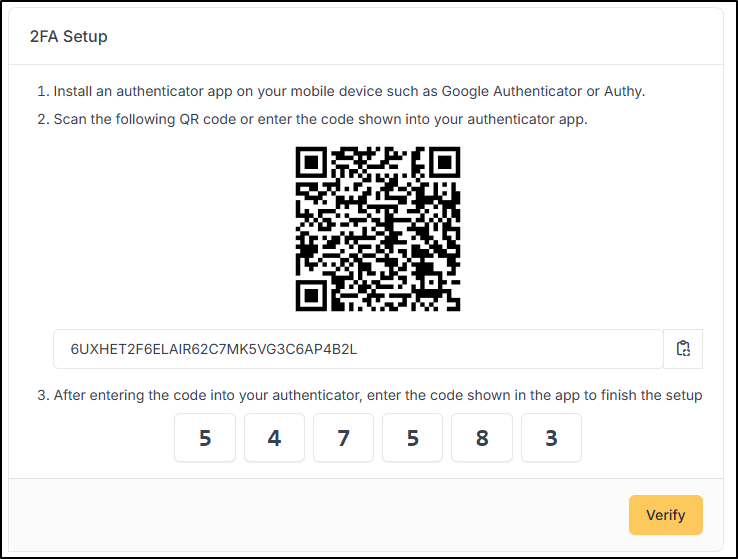
* A code appears on your application, enter it in the designated field on the GLPI side
* Click **Verify**.

<figure><img src="https://304570660-files.gitbook.io/~/files/v0/b/gitbook-x-prod.appspot.com/o/spaces%2Fuys4bnfAs7Oe2yWUUh3p%2Fuploads%2Fgit-blob-656518cb6bc8500470647830477b1e1ba6662c62%2Fsettings-2fa-validated.png?alt=media" alt=""><figcaption><p>MFA validation screen</p></figcaption></figure>

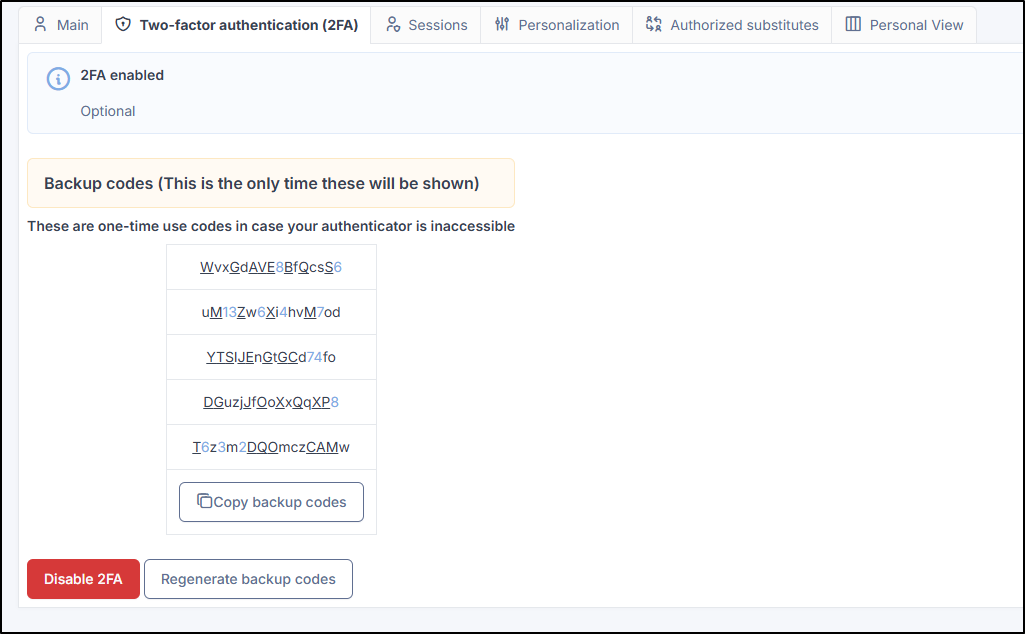
* Your MFA is now activated

{% hint style="info" %}
Keep your backup codes. If your application is inaccessible, you can use these codes to access GLPI.
{% endhint %}

<figure><img src="https://304570660-files.gitbook.io/~/files/v0/b/gitbook-x-prod.appspot.com/o/spaces%2Fuys4bnfAs7Oe2yWUUh3p%2Fuploads%2Fgit-blob-31abd6e9649c867c81ac76019fe3d3621cebdaf9%2Fsettings-2fa-codes.png?alt=media" alt=""><figcaption><p>MFA - Backup code</p></figcaption></figure>

* In this tab, you can disable your MFA (your codes will be lost and you will have to repeat the procedure above to reactivate it)
* You can also regenerate the backup codes (old backup codes will be overwritten)

***

## Sessions

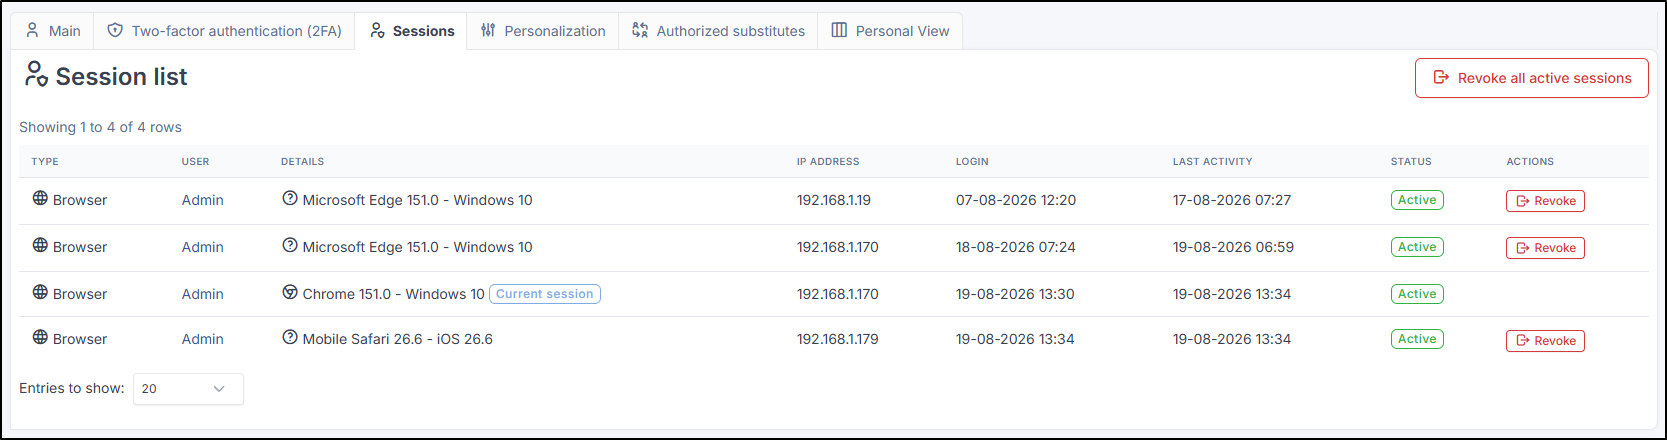
The Sessions tab lists all user sessions and allows you to revoke a specific session or all of them at once.

Information displayed:

* **Type**: connection type (e.g., browser)
* **User**: user name
* **Details**: additional browser information (e.g., Microsoft Edge 151.0 - Windows 10)
* **IP address**: IP address from which the connection originated
* **Login**: time of initial connection
* **Last activity**: time of last detected activity
* **Status**: connection status
* **Actions**: revoke session

<figure><img src="https://304570660-files.gitbook.io/~/files/v0/b/gitbook-x-prod.appspot.com/o/spaces%2Fuys4bnfAs7Oe2yWUUh3p%2Fuploads%2Fgit-blob-3288d3af7ec5b8c1b622ab6809a351f253654fef%2Fsessions-en.png?alt=media" alt=""><figcaption><p>Sessions list</p></figcaption></figure>

***

## Customization

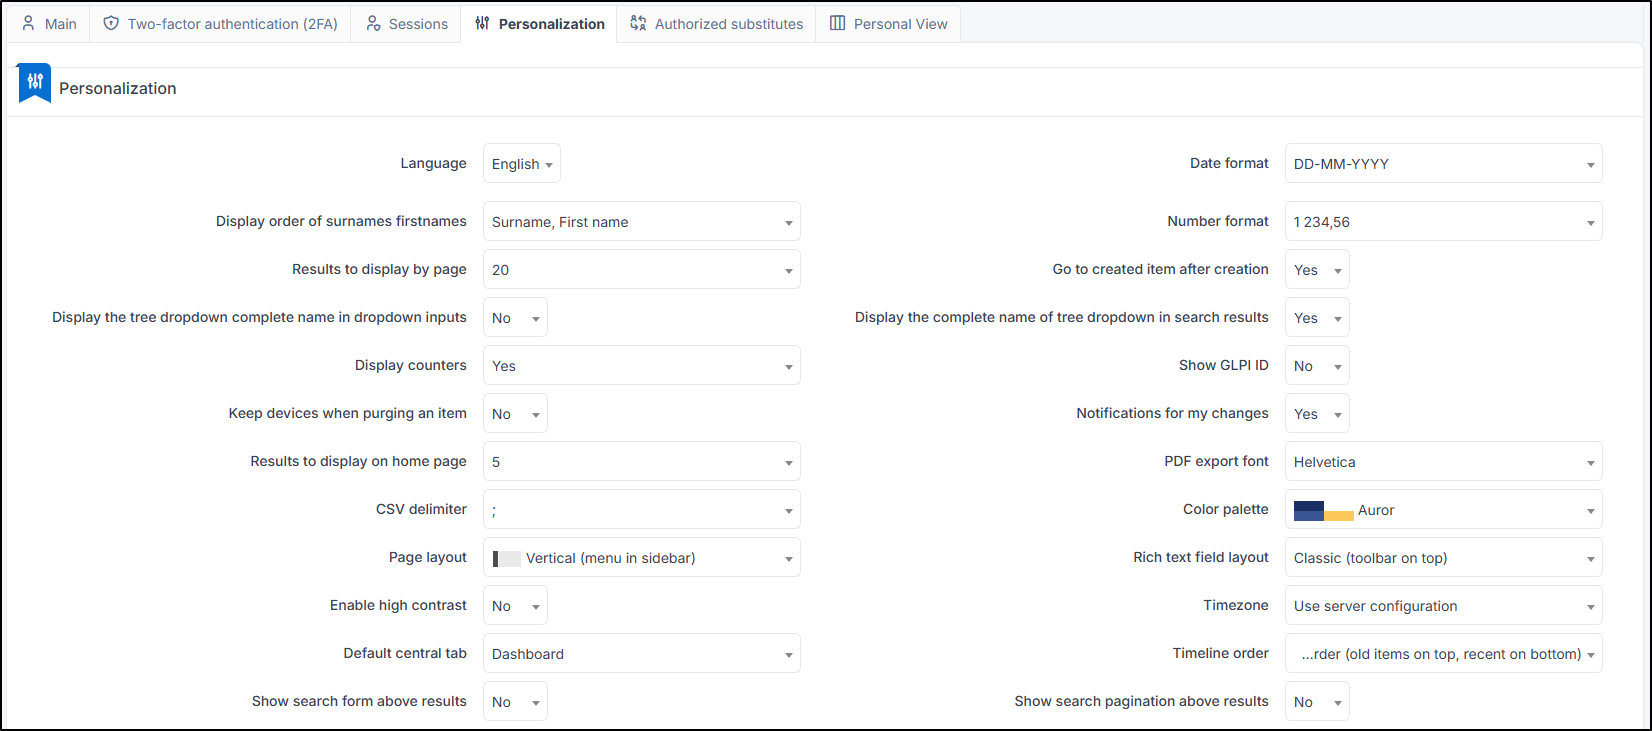
<figure><img src="https://304570660-files.gitbook.io/~/files/v0/b/gitbook-x-prod.appspot.com/o/spaces%2Fuys4bnfAs7Oe2yWUUh3p%2Fuploads%2Fgit-blob-4e8abbdecaf42c69544c09ed8e375806ec7ac8a1%2Fsettings-customisation.png?alt=media" alt=""><figcaption><p>User preferences customization screen</p></figcaption></figure>

The customization section is divided into several parts. In this section, the modifications concern the behavior of your interface. You can customize:

### General Customization

* **Language**: change the language of your interface (the language of this section takes precedence if another language is defined in the default values of the general configuration)
* **Name display order**: how do you want to display the identity of your contacts (last name, first name or first name, last name)
* **Results to display per page**: select the number of results to display for the various searches performed in the modules (1 to 50)
* **Display full tree name in dropdowns**: display or not the full names in dropdown lists (if not, this may affect layout in some cases) (Yes / No)
* **Display counters**: display counters for saved searches (Yes / No)
* **Keep devices when purging an item**: (Yes / No. No by default)
* **Results to display on the homepage**: display the number of results on the homepage of a module (tickets, computers, etc.) (5 to 30)
* **CSV delimiter**: delimiter for CSV import/export (; or , by default **;**)
* **Layout**: change the position of the main menu (horizontal or vertical)
* **Enable high contrast**: feature that modifies colors (Yes / No)
* **Default central bar**: choose which item will be visible on your homepage (dashboard, personal view, group view, global view, RSS feed)
* **Display search above results**: include or not the search engine in the toolbar (Yes / No)
* **Date format**: how to display the date (YYYY-MM-DD, DD-MM-YYYY, MM-DD-YYYY)
* **Number format**: how to display numbers (1 234.56 / 1,2345.56 / 1 234,56 / 1234.56 / 1234,56)
* **Go to created item after creation**: After creating an object, you can directly access that object (Yes / No)
* **Display full tree name in search results**: Yes / No
* **Display GLPI ID**: display the GLPI object ID (Yes / No)
* **Notifications for my changes**: be notified of your own changes
* **PDF export font**: choose the font for PDF exports
* **Color palette**: Choose your theme for your GLPI interface
* **Rich text field layout**: define the behavior of the text formatting bar
* **Timezone**: select your timezone
* **Timeline order**: order of display of the history of different types of follow-ups in a ticket (natural order (oldest items at the top, newest at the bottom), reversed order (oldest items at the bottom, newest at the top))

{% hint style="info" %}
The value for the number of results per page displayed here cannot exceed the maximum value defined in the general display options.
{% endhint %}

### Assistance Customization and Priority Colors

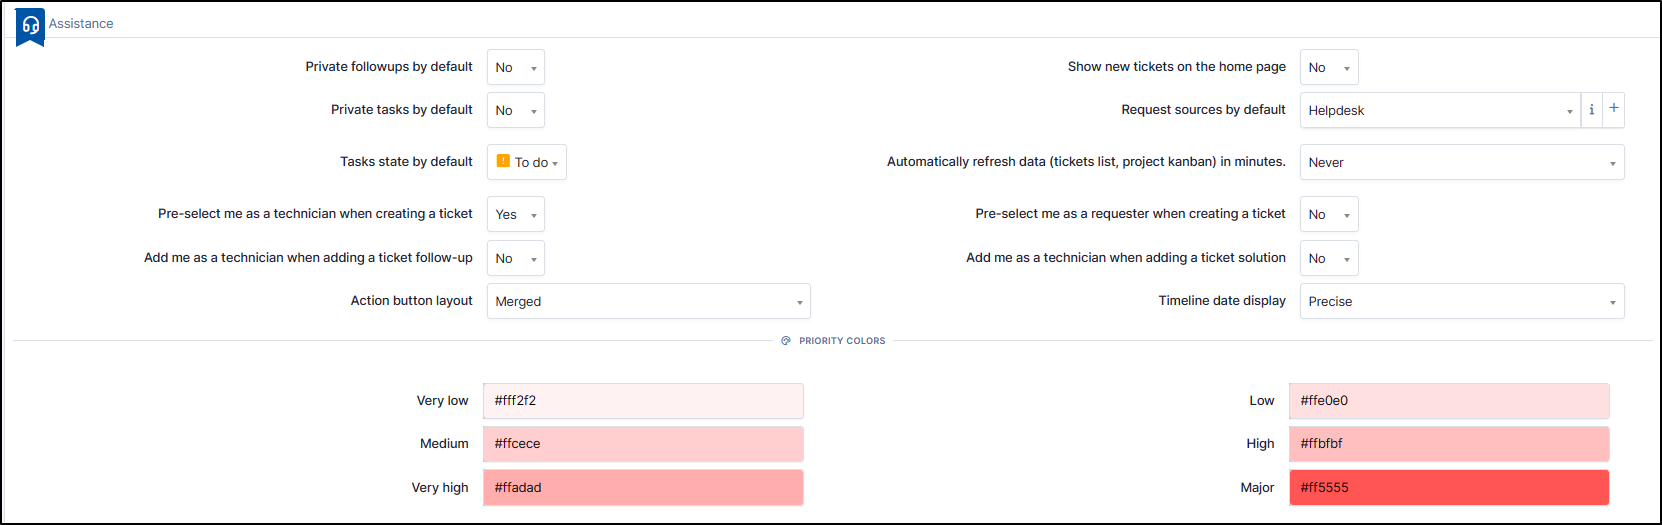
<figure><img src="https://content.gitbook.com/content/uys4bnfAs7Oe2yWUUh3p/blobs/LyHxCFXPcanxtgZG98pA/userprefs-custom-assistance.png" alt=""><figcaption><p>User preference assistance customization screen</p></figcaption></figure>

* **Default private follow-ups**: all your follow-ups will be considered private. To make them public, uncheck the private box (Yes / No)
* **Default private tasks**: all your tasks will be considered private. To make them public, uncheck the private box (Yes / No)
* **Default task status**: choose the default status for your tasks (Information, To do, Done)
* **Pre-select me as technician when adding a ticket follow-up**: when you create a ticket as a technician, choose if you will be selected as "assigned to" (Yes / No)
* **Add me as technician when adding a ticket follow-up**: if you are not assigned to the ticket and you add a follow-up, you will be assigned to this ticket (Yes / No)
* **Action button layout**: choose the layout of the buttons when you are about to reply to a ticket (*Separate* or *Merged*)
* **Display new tickets on the homepage**: display tickets in the global view from the homepage (Yes / No)
* **Default request sources**: when creating a ticket (before submission), define the request source (Direct / Email / Requester / Other / Phone / Written)
* **Automatically refresh data (ticket list, project kanban) in minutes**: Choose if you want to regularly update your interface pages (never to 30)

{% hint style="warning" %}
Be careful, if you activate this option, it is possible that the refresh takes place while you are writing a follow-up, for example, which will cause you to lose what you have written. We advise you to deactivate this option.
{% endhint %}

* **Pre-select me as requester when creating a ticket**: indicate me as requester when I am writing a new ticket (this does not prevent you from selecting other people/groups later if you have the necessary rights). (Yes / No)
* **Add me as technician when adding a solution to the ticket**: Add me as technician when I add a solution to the ticket if I was not already assigned to it (Yes / No)
* **Timeline date display**: removes seconds from dates (Precise / Relative)

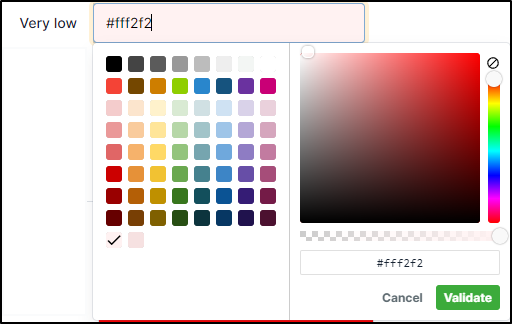
You can modify priority colors. This will change all colors for:

* Tickets
* Incidents
* Changes

Click on the color you want to modify and select the one that suits you best. You can select an already defined color, either using the color picker or with the hexadecimal code if you know it (#000000)

<div align="left"><figure><img src="https://content.gitbook.com/content/uys4bnfAs7Oe2yWUUh3p/blobs/mMecXwURRZ6eb2oebKtD/userprefs-custom-priority-colors.png" alt=""><figcaption><p>User preference priority color customization screen</p></figcaption></figure></div>

### Due date progression

<div align="left"><figure><img src="https://content.gitbook.com/content/uys4bnfAs7Oe2yWUUh3p/blobs/pKcWQ4tpTdBLRquukdC4/userprefs-custom-date-progression.png" alt=""><figcaption><p>User preference date progression customization screen</p></figcaption></figure></div>

When you add a [service level](broken://pages/zstGmhQ6wGnRG7Dtfq24), you can define:

* **The colors of the different states** (You can select an already defined color, either using the color picker or with the hexadecimal code if you know it (#000000))
* **The warning state threshold** (it is possible to configure the threshold in **percentage**, **hours**, or **days**)
* **The critical state threshold** (it is possible to configure the threshold in **percentage**, **hours**, or **days**)

### Dashboards

<figure><img src="https://content.gitbook.com/content/uys4bnfAs7Oe2yWUUh3p/blobs/CYU29PVcQqu1o0iRbFBn/userprefs-custom-dashboards.png" alt=""><figcaption><p>User preference dashboard customization screen</p></figcaption></figure>

You can configure a default dashboard for:

1. Home (homepage)
2. Helpdesk
3. Assets
4. Tickets (mini dashboard)

* For the first three options, you can select the dashboard of your choice, including those you have added.
* For the last option, tickets (mini dashboard), you can disable it or display the mini dashboard in the tickets tab.

### Notifications

<figure><img src="https://content.gitbook.com/content/uys4bnfAs7Oe2yWUUh3p/blobs/lvzFCzszi84OWJP8Baw9/userprefs-custom-notifications.png" alt=""><figcaption><p>User preference notification customization screen</p></figcaption></figure>

You can define whether GLPI displays notifications upon changes (ticket update, task added, etc.). You can define whether these should be displayed:

* Top left
* Top right
* Bottom left
* Bottom right

***

## Authorized substitutes

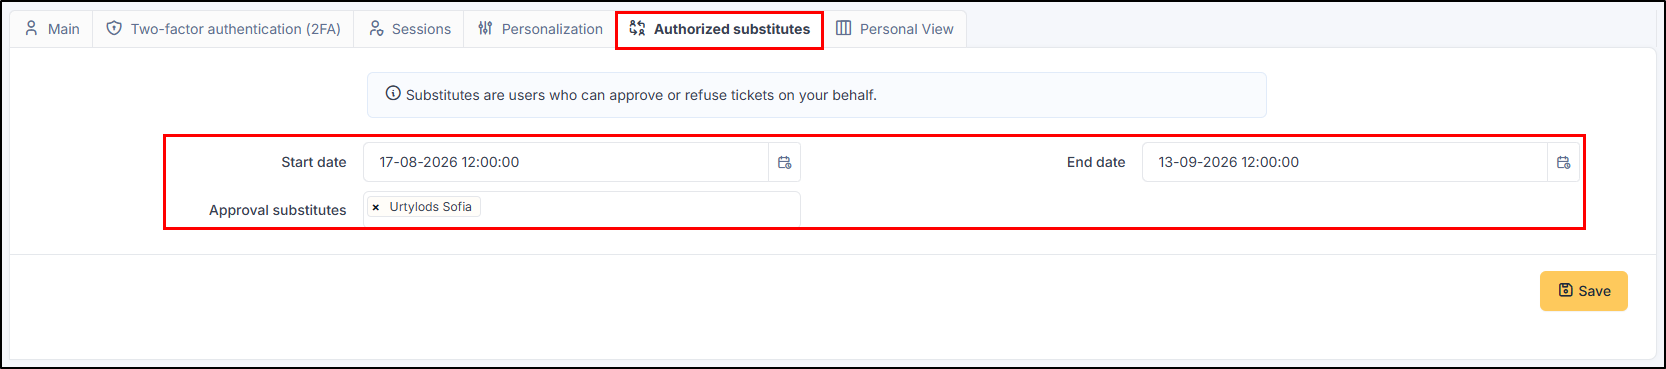
<figure><img src="https://304570660-files.gitbook.io/~/files/v0/b/gitbook-x-prod.appspot.com/o/spaces%2Fuys4bnfAs7Oe2yWUUh3p%2Fuploads%2Fgit-blob-27187dc0c5fdf972160b17fb765a7a11d72faadc%2Fsettings-substitutes.png?alt=media" alt=""><figcaption><p>Customization screen for adding authorized overrides in user preferences</p></figcaption></figure>

This option allows you to delegate ticket validation to one or more people (groups are not available here) for a certain period. Simply select the dates for which you wish to delegate your validation and select the desired user(s). If you do not select an end date, users will be able to approve tickets until you manually revoke this right.

***

## Personal View

Lists custom views defined in objects by the user. In particular, it allows you to delete personal views defined to return to global views.


---

# Agent Instructions
This documentation is published with GitBook. GitBook is the documentation platform designed so that both humans and AI agents can read, navigate, and reason over technical content effectively. Learn more at gitbook.com.

## Querying This Documentation
If you need additional information that is not directly available in this page, you can query the documentation dynamically by asking a question.

Perform an HTTP GET request on the current page URL with the `ask` query parameter, and the optional `goal` query parameter:

```
GET https://help.glpi-project.org/glpi-12/manage-my-preferences/manage-my-preferences.md?ask=<question>&goal=<endgoal>
```

`ask` is the immediate question: it should be specific, self-contained, and written in natural language.
`goal` is optional and describes the broader end goal you are ultimately trying to accomplish on behalf of the user. GitBook uses it to tailor the answer towards what is most useful for that goal.

The response will contain a direct answer to the question and relevant excerpts and sources from the documentation.

Use this mechanism when the answer is not explicitly present in the current page, you need clarification or additional context, or you want to retrieve related documentation sections.